INTRODUCTION
Animal identification using a means of marking is a process done to identify and track specific animals. It is done for a variety of reasons including verification of ownership, biosecurity control, and tracking for research or agricultural purposes. Ear tagging is mandatory for most of the genetic improvement programmes as a part of the recommended SOPs. In India, using the 12-digit identifier, based on International Committee on Animal Recording (ICAR) recommendations, more than 2.6 crore animals are registered by NDDB.
An ear tag usually carries an Animal Identification Number (AIN) or code for the animal, or for its herd or flock. Nonelectronic ear tags may be simply handwritten for the convenience of the farmer (these are known as “management tags”). Pigs, cattle, and sheep are frequently earmarked with pliers that notch registered owner and/or age marks into the ear. Mares on large horse breeding farms have a plastic tag attached to a neck strap for identification; which preserves their ears free of notches. Dairy cows are sometimes identified with ratchet fastened plastic anklets fitted on the pastern for ready inspection during milking.
Although there are many shapes of ear tags, the main types in current use are as follows:
- Flag-shaped ear tag: two discs joined through the ear, one or both bearing a wide, flat plastic surface on which identification details are written or printed in large, easily legible script.
- Button-shaped ear tag: two discs joined through the ear.
- Plastic clip ear tag: a moulded plastic strip, folded over the edge of the ear and joined through it.
- Metal ear tag: an aluminum, steel, or brass rectangle with sharp points, clipped over the edge of the ear, with the identification stamped into it.
IDENTIFICATION SYSTEMS
- Identification is usually alpha-numeric. On birth/purchase, the respective animal is identified with one unique number until it departs from the herd. For example, if in a farm tag representation of the year 2002 is M, so 2003 will be by successive letter N while 2004 will be shown as P, omitting the letter O because of its resemblance with the numeral 0. Different years may be encoded by the 22 alphabets, excluding O, V, Q, and I to avoid confusion with numbers. This means the identification system can be replicated after 22 years.
AGE AND SITE

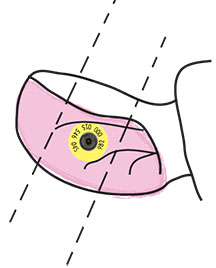
The optimum age for ear tagging should be done usually before 6 months of age. In some farms, it is practiced within 20 days of birth while some farmers tag their females sequentially as they reach puberty and enter the herd. The common tag site is the proximal half of the ear, between the upper and lower cartilage. It should be placed neither too close to the head, else it may severe the thicker cartilages and cause necrosis. Ear tags may sometimes cause chronic inflammation with Chondrus hyperplasia and osseous metaplasia of ear cartilage.
IMPORTANCE
To indicate sex
- Allows rapid sorting by sex while sheep and goats are moving down a chute or in a holding pen.
- No need to spend valuable time “check the plumbing” of each animal. Keeps your hands clean! To do this:
- Males: Insert the primary tag in the left ear.
- Females: Insert the primary tag in the right ear:
To indicate the year of birth
- Use a different color for each year.
- Begin tag number series with the year of birth. Example—tag 17275 indicates lamb is the 275th lamb tagged in 2017.
To indicate sire (and dam)
- Use a different color second tag for each sire (blue tags = Sire XYZ; purple tags = Sire ABC).
- Have sire’s name printed on the tag of its progeny.
- Handwrite the ewe’s tag number with a marking pen on the lamb’s tag. If space is limited write it on the inner surfaces of the tag. Note: Since tags can be lost, we strongly advise using 2 sire/dam tags (one in each ear).
To indicate problems
- Put a tag that says “cull” (or a black tag) into problem animals.
- Use an ear notcher to mark the animal for culling.
To indicate single, twin, or triplet
Premier’s code is:
- blue = single
- green = twin
- orange = triplet

DIFFERENT TYPES OF TAGS IN ANIMALS
| Birds | Dogs | Horses |
| Leg rings Wing tags Microchip implants (parrots) Telemetry (falconry birds) | Collar Microchip Implants Tattoo | Collars (non-electronic) Branding (hot-iron) Branding (freeze) Microchip implants Lip tattoo |
| Cattle | Sheep | Pigs |
| Anklets Branding (freeze) Branding (hot-iron) Collars (electronic and non-electronic) Earmarking Ear tags (non-electronic) Ear tags (electronic) Rumen bolus (electronic) Cowbell | Freeze branding Branding (hot-iron) Collar Earmarking Ear tags (non-electronic) Ear tags (electronic) Semi-permanent paint | Collars (electronic and non-electronic) Earmarking Ear tags (non-electronic) Ear tags (electronic) Semi-permanent paint Tattoo |
DO’s

- Properly secure the animal to apply the tag. The movement of the animal’s head could create an undesirable situation to appropriately apply the ear tag. This could cause injury to the person or livestock or improper tagging of the animal. The following immobilization suggestions work best, depending on the species:
- Cattle: Chute with a head gate, halter, and/or nose lead.
- Swine: Confine in a small pen, hog boards to restrict movement, or use of a hog snare to completely secure the hog.
- Sheep & Goats: Proper hand grip of animal’s head to restrict movement.
- Identify the tagging site on the animal’s ear.
- Tags should be applied in the middle third of the ear between the upper and lower ribs.
- It is important when using electronic identification (EID) tags to apply the tag with the visual panel, the male portion, of the tag on the outside back of the ear with the EID button, female portion, of the tag on the inside of the ear.
- Proper hygiene and cleanliness during the tagging process is necessary to reduce the risk of infection. Use rubbing alcohol or a disinfectant solution to clean the jaw of the applicator. Also, clean the tagging site of the animal’s ear.
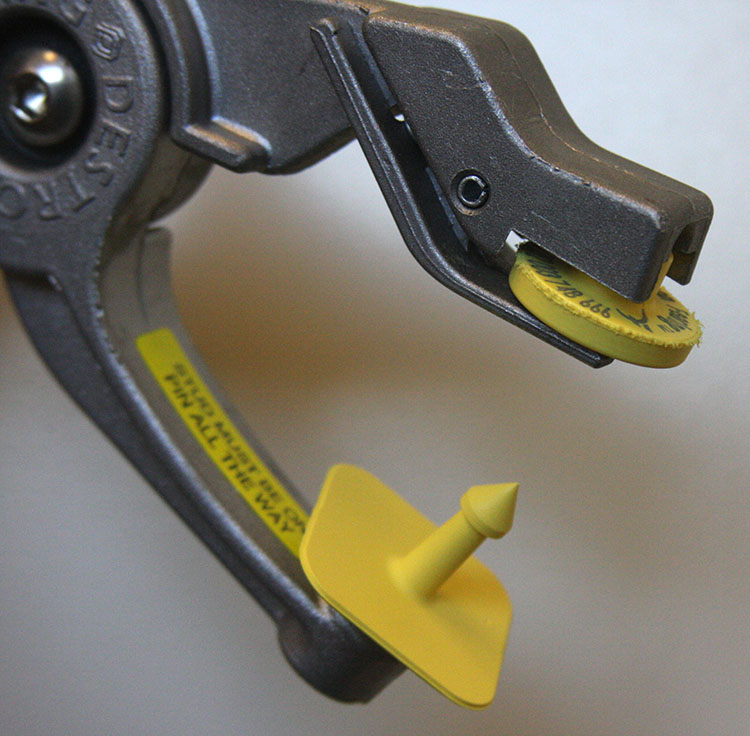
- Place each half of the tag onto the applicator. The stud must be inserted completely onto the applicator pin and the panel/button portion placed under the opposite clip.
- Before tagging the animal, check the alignment of the tagger by closing the jaw of the applicator to the point where the two halves meet; the stud should be centered with the hole.
- Position the applicator in the identified tagging site on the animal’s ear. Firmly close the applicator in a fast manner and release.
- Examine the tag to verify it is correctly, comfortably, and securely positioned. Record necessary data on the animal.
- Once the animal has been tagged, proper care must be taken to ensure the animal stays healthy. Daily topical application of hydrogen peroxide directly to the ear and ear tag puncture for five to seven days following the tag application will assist in preventing infection. Additional topical application of hydrogen peroxide to the ear in the following weeks is recommended until the ear is completely healed. If a serious infection occurs, consult your veterinarian for assistance and recommendations for treatment.
DON’Ts
- Never practice ear tagging on a windy day and when the stock is wet, to minimize chances of infection.
- Numbered side should appear on the back of ear.

Dr. Manisha Singodia
Department of Veterinary and Animal Husbandry Extension Education, RAJUVAS, Bikaner


